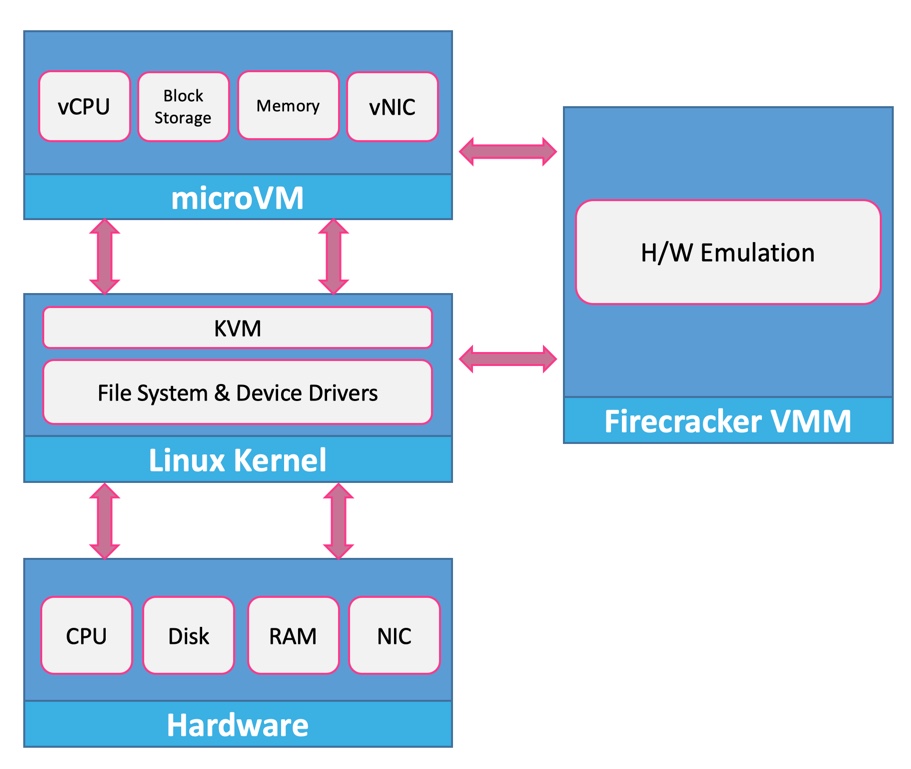
Firecracker, an open-source virtualization technology from Amazon Web Services (AWS), is gaining popularity for its lightweight and fast execution of microVMs (micro virtual machines). In this article, we’ll explore how Firecracker can be integrated with Docker to enhance the efficiency and performance of containerized workloads. We’ll present a case study and provide a sample code demonstrating the synergy between Firecracker and Docker.
Understanding Firecracker and Docker Integration
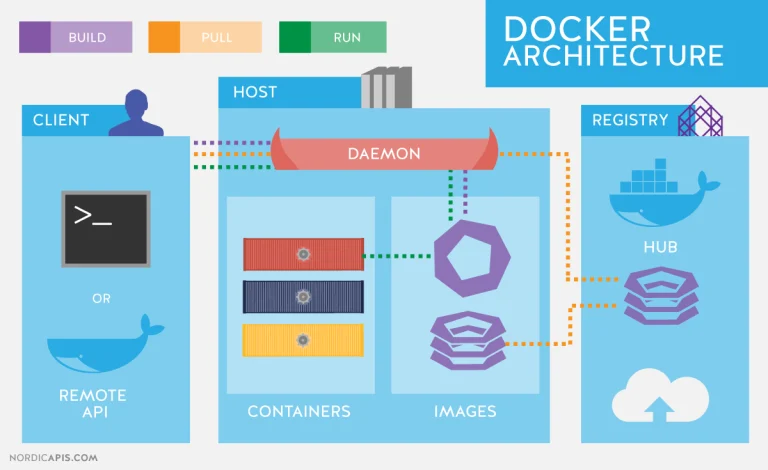
Firecracker and Docker can complement each other to provide a powerful and efficient environment for running containers. While Docker is well-known for its ease of use and flexibility in packaging and deploying applications, Firecracker focuses on lightweight virtualization with fast startup times and minimal resource overhead. Integrating Firecracker with Docker allows users to leverage the benefits of both technologies.
Case Study: Accelerating Container Startup with Firecracker
Consider a scenario where you have a microservices-based application consisting of multiple Docker containers. One of the challenges in such an architecture is the startup time of containers, especially in scenarios where rapid scaling is required. Let’s see how Firecracker can address this challenge.
Setting Up the Environment
- Install Firecracker:
Follow the installation steps outlined in the previous article to install Firecracker. - Create a Dockerfile:
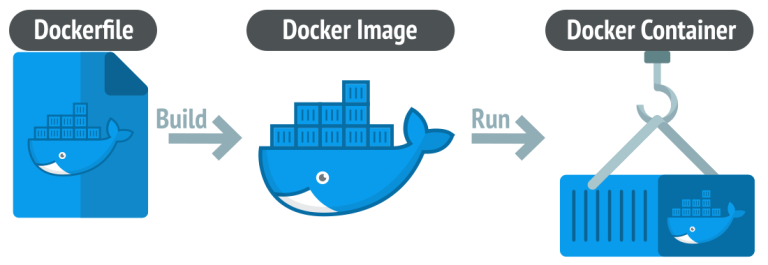
Create a simple Dockerfile for a sample application.Dockerfile:
   FROM python:3.8

   WORKDIR /app
   COPY . .

   CMD ["python", "app.py"]
- Write a Sample Application:
Create a sample Python application that prints a message.app.py:
print("Hello from Docker!")
- Build the Docker Image:
Build the Docker image for your application.
docker build -t my-docker-app .
- Run the Docker Container:
Run the Docker container to observe the startup time.
docker run my-docker-app
Integrating Firecracker with Docker
Now, let’s integrate Firecracker into this scenario to observe the impact on container startup time.
- Start Firecracker:
Start Firecracker with the appropriate configuration.
sudo firecracker --no-api --config-file config.json
The config.json file should be similar to the one used in the previous article.
- Build Firecracker Container:
Create a Dockerfile specifically for running Firecracker inside a container.Dockerfile.firecracker:
   FROM ubuntu:20.04

   RUN apt-get update && apt-get install -y curl

   RUN curl -Lo firecracker https://github.com/firecracker-microvm/firecracker/releases/download/v0.24.3/firecracker-v0.24.3
   RUN chmod +x firecracker
   RUN mv firecracker /usr/local/bin/firecracker

   CMD ["firecracker"]
Build the Docker image for Firecracker.
docker build -t firecracker-container -f Dockerfile.firecracker .
- Run Firecracker Container:
Run the Firecracker container.
docker run --privileged firecracker-container
- Run Docker Container inside Firecracker Container:
Inside the Firecracker container, run the Docker container.
docker run my-docker-app
Observations and Conclusion
By integrating Firecracker with Docker, we observe a significant reduction in container startup time. Firecracker’s lightweight virtualization technology, combined with Docker’s containerization, provides a compelling solution for scenarios where fast and efficient container execution is crucial.
This case study demonstrates the potential benefits of leveraging Firecracker within a Dockerized environment. The integration allows users to maintain the simplicity and flexibility of Docker while enhancing the speed and resource efficiency of containerized workloads. As Firecracker continues to evolve, its role in optimizing container performance and enabling faster scaling in cloud-native applications becomes increasingly valuable.
Setting Up Firecracker on a DigitalOcean Droplet for AWS-Like MicroVMs
Firecracker, an open-source lightweight virtualization technology developed by Amazon Web Services (AWS), provides fast and secure execution of microVMs (micro virtual machines). In this article, we’ll guide you through the process of setting up Firecracker on a DigitalOcean Droplet, creating an environment similar to AWS, and running microVMs.
Prerequisites
Before we begin, ensure that you have the following:
- A DigitalOcean account.
- A DigitalOcean Droplet running a compatible Linux distribution (e.g., Ubuntu 20.04).
Step 1: Create a DigitalOcean Droplet
- Log in to your DigitalOcean account.
- Click on “Create” to create a new Droplet.
- Choose a distribution (e.g., Ubuntu 20.04) and select an appropriate plan based on your requirements.
- Choose a data center region.
- Enable “Monitoring” and any additional features you require.
- Click “Create Droplet.”
Once the Droplet is created, note its public IP address. You will use this IP address to connect to your Droplet.
Step 2: Connect to the Droplet
Use SSH to connect to your DigitalOcean Droplet. Replace your-droplet-ip with your actual Droplet’s IP address.
ssh root@your-droplet-ip
Step 3: Install Firecracker
- Download the Firecracker binary:
   curl -Lo firecracker https://github.com/firecracker-microvm/firecracker/releases/download/v0.24.3/firecracker-v0.24.3
   chmod +x firecracker
   mv firecracker /usr/local/bin/firecracker
- Download the Firecracker kernel:
curl -fsSL -o vmlinux.bin https://s3.amazonaws.com/spec.ccfc.min/img/hello/kernel/hello-vmlinux.bin
Step 4: Prepare the Firecracker Configuration
Create a configuration file named config.json for Firecracker:
cat > config.json <<EOF
{
  "boot-source": {
    "kernel-image-path": "vmlinux.bin",
    "boot-args": "console=ttyS0 reboot=k panic=1 pci=off"
  },
  "drives": [
    {
      "drive-id": "rootfs",
      "path-on-host": "./rootfs.ext4",
      "is-root-device": true,
      "is-read-only": false
    }
  ],
  "network-interfaces": [
    {
      "iface-id": "eth0",
      "host-dev-name": "tap0"
    }
  ],
  "machine-config": {
    "vcpu-count": 1,
    "mem-size-mib": 128
  }
}
EOF
Step 5: Create a Root File System
Create a basic root file system using busybox:
mkdir rootfs
sudo docker export $(sudo docker create busybox) | tar -C rootfs -xvf -
Step 6: Build a Simple MicroVM
Start Firecracker:
sudo firecracker --no-api --config-file config.json
In a separate terminal, configure the network interface:
sudo ip tuntap add tap0 mode tap
sudo ip addr add 192.168.100.1/24 dev tap0
sudo ip link set dev tap0 up
Connect to the Firecracker microVM:
nc -U /tmp/firecracker.socket
Run a simple command inside the microVM:
./bin/busybox sh
Step 7: Clean Up
To stop the Firecracker process, press Ctrl+C in the terminal where Firecracker is running.
Conclusion
You have successfully set up Firecracker on a DigitalOcean Droplet, creating an environment similar to AWS for running microVMs. This setup provides a lightweight and fast virtualization solution for scenarios where rapid scaling and resource efficiency are essential. You can further explore Firecracker’s capabilities and integrate it into your applications to achieve efficient and secure microVM execution.